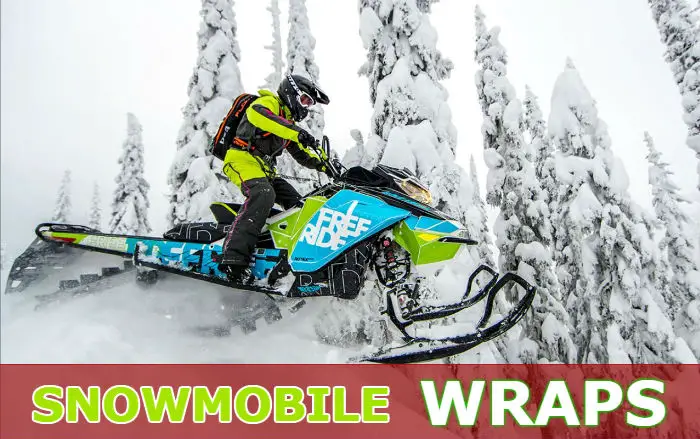
Hey there folks, it’s your boy here, once again bringing you undying wisdom on all matters snowmobile. Today I will talk to you about something about what I and many others are pure suckers for customization, more specifically: snowmobile wraps.
We all have bodies. Those tangling fleshy bits of ours serve many functions dictated by evolution. While we have learned throughout history how to groom some of them for our aesthetical benefits, most are there to remain untouched. For now.
Our beloved scientists out there are currently working on ways to incorporate technology into our bodies without us dying. Once we reach that point, it is a matter of imagination how we will customize our looks. But until then, we are stuck with those fleshy little bits of ours.
This, however, didn’t ever stop us from flipping evolution the bird and making our looks stand out from the crowd. Grooming your hair, coloring it, tattooing your skin, clothing, makeup, wearing accessories and many other similar methods are there for us to abuse.
Let me tell you, people like to customize. Whole industries have risen around this here concept. And just like with our bodies, customization has become something of a zealous quest for many of us. We all know that girls love ”customizing” themselves, but let me tell you something. Out there, nobody is more of an avid fan of this word than the riders. Bikes, A.T.V’s, Choppers and sleds, they are all a big, lovely and colorful family. Today, however, I will be talking about snowmobile wraps.
Why wrapping?
 Simple: because it is the best way to customize a ride. For the untrained eye, any colorful design will do, regardless of the quality of the used materials or the process involved. This leaves many riders none the wiser, seeing as how anything will do. But for anyone out there who did their homework, customizing a ride is not something to sneeze at.
Why? Because you wouldn’t want your snowmobile to have its exterior peel off after taking it outside for a few rides only. You want it to look as gorgeous as possible until the very end.
After reading this, you might have been struck by the expression ”peel off”. Well deduced my friend. For there are, out there, two ways to facilitate customization: wrapping and painting. However, don’t mistake painted customization with the paint-coating sleds come out from the factory with. The paint I am talking about is what you would do to it for cosmetic purposes.
Wrapping
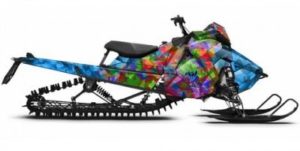
The most commonly used practice up to date for customizing your ride. It revolves around completely or partially covering your sleds’ original coat of paint with vinyl wraps of different colors. The beauty of it is that it is not only limited to plain old, simple vinyl. Just like makeup, it can add other nice touches to your ride, like gloss and matte. And the utmost beauty of it is that it is made to last. The average manufacturer of vinyl will make it so that it will last for about 10 years, so no worries in that regard.
It is however not only limited only to add more sparkles to the ride. It is often used to reinforce it by adding a secondary layer of the same color to protect the paint.
Painting
Although not as popular as vinyl wrappings, painting is the go-to choice of many riders. The issue with this method is that it is way more inefficient than its counterpart. Same as letters vs emails. Yes, they do the same thing, try sending a letter from Alaska to Singapore and compare its efficiency to an email.
You could ask the creator to paint and customize it per your specifications or even do it yourself. But this is not what I am here for. That is something for another time. I am here to tell you about how you can personally choose and apply the best wraps to your ride.
Advantages of wrapping
 Until their removal, wraps will not require special maintenance, whilst without them, your ride will require constant re-painting, waxing, etc. Following the same logic, if you get bored with any color it has, you can simply replace it with another.
Painting, on the other hand, will be a lot trickier, especially with a curvy sled. Also, not only will you not need to repaint it, but it will also protect your existing coat of paint. Then we have the issue of convenience. Although it requires practice, it is far easier than painting and it is not dangerous to your lungs.
Also, it doesn’t need to dry out as paint does. It is much easier to customize and there is a huge variety from where to choose from. And the cream of the crop: if dented, the only thing you will need to do is to replace the wrap. Unwrapped surfaces will require an entire ceremony of leveling, polishing, re-painting, waxing, etc.
One last advantage lies in the pricing. Usually, wrapping your sled will cost half or even three times lower than painting it fully. This means that, fully, it will cost you about 500-1000$. It might seem pricey, but it will last you for a very long time. And trust me when I say that it is way cheaper than re-painting it constantly for 10 years.
Disadvantages of wrapping
Nothing can be too good to be without disadvantages. For starters, you will require lots of preparation. Due to the numerous and small curves of a snowmobile, you will have to take the precise measurements.
It also requires lots of dexterity to remove in case of scratching.
The pricing factor is another detriment to many, as it will add up in price, depending on the design, quality, material, etc.
Also, like the joints of a medieval armor, not all places can be covered, so you will be left with a ”rich” color pallet.
But all in all, the advantages do indeed outweigh the disadvantages. So let us get to the good stuff.
Where to find awesome wraps?
The best places you can find awesome wraps are eBay and Amazon. Check out these ones here.
How to attach your vinyl roll to your sled
Step 1: choose the vinyl
It is all a matter of personal preference. The length, the colors, the shapes – they are all up to you. Remember that, despite them being tough throughout the years, they can be easily replaceable. So whenever you get bored with your current design, you can always choose another.
Another quirk of vinyl wraps is that you can design them yourself (or hire someone to do it). Just design it on a computer, send it to the manufacturer and enjoy your personalized vinyl wrap. This, however, due to not being standardized production, will cost you more.
As for availability, you will most likely find your desired vinyl in rolls 150 cm/60 inches wide and 7-8 m/25 feet long. The pricing on this varies from manufacturer to manufacturer, but regardless of its origins, the product has a steep pricing. Beauty doesn’t come cheap and without some sacrifice.
Although I will make a more in-depth analysis during the next ”step”, you should know that you are about to sink some good money into this. But what is a little financial investment to someone who wants to look all cash money?
Types of vinyl
Glossy: the most ”realistic” one of the bunch, due to the fact that it resembles normal paint. It is also cheaper, due to it not being, usually, made with designs. It is there to both give your vehicle a very shiny aspect and to protect the paint from scratches and sun rays. And just like make-up, it can replicate the original paint even better, giving it a nicer, albeit too unnatural aspect.
Matte: the matte vinyl is a more ”extravagant” sort of covering. Simple and effective. In essence, the matte wrap takes away the reflection and shine factors. Due to it making so that reflections are almost obsolete, you will never have to ever again buy waxes and polishes.
Also, the matte variant reacts poorly to any products that include wax, silicone or any other glossing agents. It requires specific products to clean and maintain.
Its advantages and disadvantages are a two-sided blade and this revolves around the way it behaves when damaged. Think of it as a one time, but a very powerful energy shield.
Let us take a rock for example. You scratch the sled with that rock. The matte vinyl will be trashed, but there is no vinyl out there that is better at protecting than this one. It is also easy to strip off and replace.
There are also special types of matte that ”regenerate”, like 3M and XPEL. All you will need is a strong heat source, like a hair-drier and some sun.
Should you choose matte vinyl, avoid the ones with patterns, as they are expensive and you might have to switch them constantly.
Satin: a close relative to the matte vinyl, this type is the middle ground between glossy and matte wraps. And although glossier than matte, it will still fail to show clear reflections on the surface. All in all, a middle ground between the two mentioned above and there is not much to say about it.
Brushed: another ”extravagant” type of vinyl. This one is the best solution for giving your ride a very nice brushed finish look without the brushed paint job. It also comes mainly is luxurious colors, such as Chrome Brushed, Gold Metal, Dark Grey Charcoal, Light Grey, etc. Basically, the ”look at me, I am rich” look, without actually being rich.
They are usually made from commercial- grade quality, high-density urethane vinyl. This means that they boast high scratch resistance, are easy to maintain and are great for any part of your sled. One of its biggest advantages is that it is very easy to clean with water. It is also resistant to the elements.
Carbon: similar in nature to its brushed counterpart, it will give your ride a very rich and realistic carbon aspect, without any carbon paint job. It is very similar to its brushed counterpart, albeit with less brush and with more carbon. Nothing else to say here.
Custom print: This is less of a material or aspect given to the vinyl and more the convenience aspect factored in. The clue sits in the title. It refers to a design sent to a manufacturer, who will then create it to your exact specifications. This then connects with the cutout shape.
Cut out shape: ties closely with the custom print. It refers to any design or material cut out by a machine to your exact specifications and measurements. That can be then easily stuck on your ride.
It is commonly acknowledged worldwide that the best vinyl wraps out there are the following:
- Wholesale Decals Polaris Shift
- Wholesale Decals Arctic Cat
- Wholesale Decals Ski-Doo
- 3M 1080 M12 Wrap Film
- VVIVID XPO
- CARLAS Reflective Tape
- Atmomo Wrap
- VVIVID Glow
And don’t worry about some of them being classified as the best car vinyl wraps. Despite cars and sleds being different in nature, the process and end results are the very same. However, the snowmobile and its many shapes, curves and edges will prove to be a more difficult challenge.
Step 2: analysis
Although it is a vehicle, the snowmobile is not a car. Applying vinyl to cars is an easy process, due to their flat surfaces. A car, however, isn’t a sled and a sled is more curvy than a fine damsel.
This will complicate the process by a little bit, because ”free-handing” it like a normal car will without doubt screw the modeling. And the last thing you would like it to have are those little lumps of air or worse to ruin your work.
And curvy lines require measurements. Lots of them. In fact, even cars require many precise ones in order to look good. And we are talking here about almost entirely flat surfaces. With snowmobiles, it is another whole level.
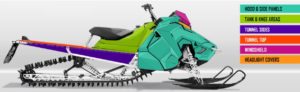
Above stands a detailed picture of all the different sections of a snowmobile. This is a 2D adaptation and you can already see how many edges and curves one has. And measurements have to hit the spot precisely. Even a few centimeters off will make it lose any resemblance of beauty.
Picture it like removing the protective transparent wrap from a new phone and then putting it back. I can already sense your shivers when thinking about all those clots and air bubbles underneath.
Step 3: prepare the original paint
Working with vinyl is like painting your ride all over again. This means that you will have to follow the right steps for the best results. Before you do anything with the vinyl, start cleaning your ride with some paint cleaners and with alcohol.
It is commonly acknowledged that whatever there might be on the paint before the application of the vinyl will be enlarged ten-fold. So everything from scratches to lumps of paint, dead bugs and other such inconveniences will look much bigger under the vinyl.
It is also imperative to have your original coat of paint covered with vinyl. This is because it will protect it from scratches, dents, small flying rocks, sun rays, raining men and other such things.
Thus, if you don’t want to spend so much on cosmetics, a transparent coating will protect you and your money from repairs. Many use this in order to save money should they desire to sell it down the road without repairing much of it.
Step 4: application
- Start with measuring every section, component and edge you will wrap. Calculate it so that you will always have a bit more extra vinyl tangling freely. Better more, than not enough.
- After that, choose whatever type of vinyl wrapping you would like to cover it with.
- Gather all the necessary tools: vinyl, cutter/scissors, squeegee, clean cloths, rubbing alcohol, 99 Primer and a heat gun or a hairdryer.
- Clean everything. Remove any existing stickers if you wish to cover said areas. After that, use cloths and rubbing alcohol to make it nice and tidy.
- Apply 99 Primer to edges and curves in order to add adhesive strength to the wrap when added.
- Add the vinyl. Again, leave some additional vinyl uncut, just in case.
- Press smoothly with your hands. When you are forced to deal with compact areas, such as the motor tank, opt for a change of tactics. Instead of going from one end to the other, press it on the center and move with equal force towards the edges. This will facilitate equal distribution.
- Use the squeegee to make sure that any air bubbles are gone. Pay exceptional attention to the corners.
- Plan accordingly for where the seams of vinyl intertwine with each other. In a perfect world, they will fit like two Lego pieces, without overlapping. If you cannot avoid this, however, make sure it will not exceed more than half a centimeter.
Conclusion
I wish to thank you for dedicating your personal time to share in the information I am proud to bring before you. For more information in the form of Questions and Answer, head over to https://www.wrapdirect.com/motorcycle-wrap-kits/ and enjoy the ride.