
 All about snowmobile studs
In this article, we are going to talk about snowmobile studs. Honestly, it is going to be gripping (pun intended). You might not think about your snowmobile’s studs, but without them, in certain conditions, you will not be going anywhere. Maybe then it is essential that you get to know about them.
What are snowmobile studs?
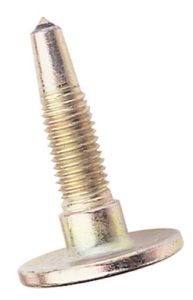
You probably think what snowmobile studs are? A snowmobile stud is a small tack like a piece of metal that can be added to a snowmobile track to aid braking and the snowmobile’s maneuverability. They are generally constructed from steel or stainless steel with carbide tips. They also come in various types and lengths depending on your needs.
What do snowmobile studs do?
The main thing that snowmobile studs will do for your sledding is providing you with grip. When do you need a grip?
- Studs provide better acceleration. If you are racing a sled, they will help you holeshot. Studs do this by gripping into ice and hard packed snow, stopping your tracks from losing grip and just spinning.
- Not only do they help you accelerate but they will help you slow down. I am sure you don’t need us to tell you how being able to stop quickly and smoothly can save your life out on the trail. If your snowmobile’s track locks up, the studs will dig into the ground and help bring you to a stop.
- As well as accelerating and braking they can also help you when cornering. Again the studs will dig into the terrain. Stopping your backend from swinging around and becoming your front end. That is never a great situation and can be fun and deadly all at the one time.
- If you have to cover a few bits of roads or parking lots here and there; then your track might not want to grip the ground. Roads and asphalt are where studs will again help you by providing a lot of grip.
If this all sounds too good to be true and you are wondering what the downsides are? Below is the answer to that very sensible question.
- Some trails will not let you if you have studs. Studs being grippy means they can dig up terrain, so some places with have prohibitions on them. You will find this to be particularly true if the trails are also walking trails in summer.
- Your trailer will not particularly enjoy studs. You will want to put track mats on your trailer if you ride with studs. No track mats and your trailer may not last a very long time.
- As well as your trailer your snowmobile’s track itself may not like the studs. What we really mean though is if you fit them poorly, they can rip and damage your track. Fit them professionally, and there should be no difference in lifespan.
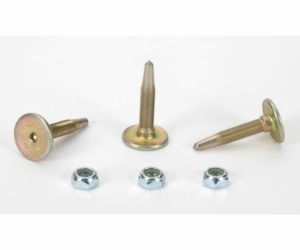 Now you know the good and the bad about snowmobile studs you will want to know what styles you can buy. There are two main styles of a stud. You get to push through or T-nut. I hope you can guess why a push through stud is called push through.
Push through or T-nut
Being fitted by being pushed through your track, you will find that these studs need less maintenance than T-nut style. With their bigger backing plate, you will see that push through studs are less likely to rip your track. T-nut studs are where you want to go if you race. They are much lighter than the push through style. Remember and pop a bit of Loctite on your studs if you’re going to save any future hassle.
So like most people you have probably now decided to use push through studs. Your next question would be what length I should use? The main thing limiting the length of stud you can use is the amount of clearance your snowmobile has.
The next item to look at is your snowmobile track’s lugs. You will want your stud to be up to 3/8” longer than your lug height. If you go longer than this, you start to get those clearance problems and can damage your sled’s chassis or exhaust. You do not want to be damaging either of these expensive parts. If your snowmobile has lugs of different heights, use the largest one to measure.
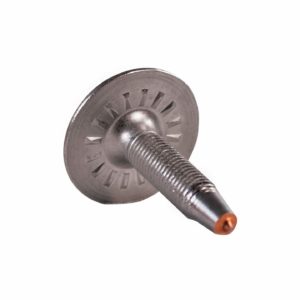
We would recommend going between ¼” and 3/8” longer than your lugs. Now then you need to decide if you are going for steel or stainless steel with carbide tips. As many of you will already know, steel rusts and stainless doesn’t/ Stainless can rust though, it just needs certain conditions, another myth burst.
Steel or stainless?
 You will also hear of magnetic and non-magnetic stainless studs. Magnetism is used to describe them as stainless steel comes in various guises and alloys. Magnetic stainless steel is mainly used for screws, makes it easier to use a screwdriver with them. Non-magnetic stainless is better for machining into complex shapes. You probably will not be able to find a difference, except the magnet, between either type.
Stainless steel is also a harder material than some basic steels. Stainless steel is less likely to bend or snap when you are out riding. You will find that most good stud manufacturers have a two year or more warranty against bending.
The stainless steel studs have a carbide tip as carbide is an excellent material for staying sharp. You don’t want your studs getting blunt on the first trail run with them. You want them to stay sharp for a while, and carbide is the best material known to man for doing this. There is a reason that saws have a carbide coating.
Stud patterns and templates
Once you have decided on studs, you probably want to know how to fit them. Rather than creating your own model and order for fitting studs, you can find many companies already have this. Going online and searching through the major stud manufacturers will give you a lot of templates. You will find patterns for hard packed, ice, or racing. Take the easy route and follow one of these guides.
How to fit studs
Once you have found the studs of your dreams, you will want to fit them. The first time you fit studs will take time and a lot of thinking. Make sure you have a cup of tea ready as you will need to take a break at some point.
You will need to have a drill with a track drill bit ready if your sled does not have holes pre-molded into the track. You may also need to fit tunnel protectors. If you need tunnel protectors, do not forget them, as you will wreck your sled otherwise. You have been warned.
- Loosen your track and remove your sled’s drive belt. Removing the drive belt means that you can turn your sled’s track by hand.
- Lift your snowmobiles back end up, to where you work comfortably. Now grab a paint pen and start to mark out your stud pattern. Some people recommend chalk, but you can accidentally remove markings, so I prefer to stick with a paint pen.
- Make sure your final and first lug line up with each other. You know how many lugs you have? If you have a 121” track, you will be looking at having 48 lugs if you have a 2.52” pitch. 121/2.52 = 48. Find your pitch and track length and this is easy. Otherwise, you’ll have to count. Worry about keeping your scratch lines perfectly straight. If each stud is perfectly aligned with the previous one, then they will always hit a groove. You want them to find fresh terrain to bite into if you want loads of grip
- So you have checked the pattern, then rechecked it. Now you are ready to grab the drill. Make sure when you drill the holes that you are not drilling into anything other than your track. We don’t want to cheese grater your snowmobile.
- Now you have a track with a load of holes. Grab your studs. You will push your studs through from the back.
- Hold the backing plate and twist the nut on by hand. If the nuts are not nylon nuts add some Loctite. Once it is hand tight, you will need an Allan wrench and a deep socket. The Allan wrench will hold the stud while you tighten the nut with the deep socket.
- Tighten till the stud is flush with the rubber. Do not over tighten or under tighten here. It is easy to get sloppy when you are on the 90th stud. Take a break at some point and drink that tea or coffee you made. Always make sure the manufacturer wants the stud flush though, some don’t fit flush.
- Go shred.
I bet you never realized there was so much to know about studs? There is a wealth of information out there. Just talking to your buddies can add to what we have said here. They know your local conditions better than me so go and talk to them.
Remember when you first put studs on your life will become more gripping.