
One way to stand out on the track is to have snowmobile tail lights. They are great and come in all shapes: tail lights, helmet lights, side lights, even boots tail lights, etc. Besides looking awesome on the track they have a safety purpose: to make you visible on the track, especially when it’s dark outside or foggy weather.
I will present the basic types of snowmobile tail lights and will let you choose which one suits you best.
Original
The original tail light and bulb are probably the best to use for your sled. If you don’t want fancy light or changing the bulb with a LED one, which can be indeed much brighter, this is the way to go. Your sled can have different lights for the turn signal. Some after-market tail lights have these in the same light bar as tail and brake. (Audi style).
How does it work?
On most snowmobiles, there are 3 wires connected to the tail light. These come from the voltage source to the back of the snowmobile. The wires are usually placed under the seat and they end with a connector near the tail lights. Usually, you can find them near the gas tank, below or above it.
Tail lights wires
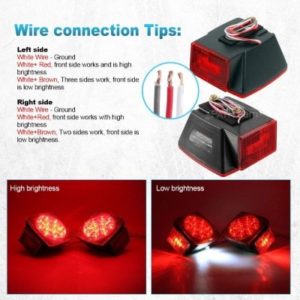
The colors of the wires can be different depending on the sled’s model. Usually, they are colored like this:
- White wire – Ground or “Negative” lead. This is connected to the ground.
- Brown wire – “Positive” lead, when the tail light is turned on
- Yellow wire- This one is connected to the brake lever. The brake lever has a switch. When the brake is pressed, the switch will close the circuit and will make the brake light come on. Some models have functionalities for Turn light as well, so they can use this yellow wire.
Which one to buy?
There are many types of aftermarket tail lights classified by:
Shape:
- rectangular shape
- bars or strips
- oval
- square
Technology:
- incandescent bulb (only old ones)
- LED light
- Laser (mod)
Functionality:
- Stoplight
- Turn signal
- Tail Light
There are multiple variants you can buy. Most of the tail lights are universal/generic and will fit most automobiles, snowmobiles, ATVs, UTVs, dirt bikes, campers etc. When you get universal lights, make sure they are waterproof. Most of them are, but not all. When the snow melts it could affect the lights.
Snowmobile Tail Lights Mod
In order to mod your tail lights, you will need to follow these steps. These steps are valid for most snowmobiles, but even the fact that they are pretty generic, it still depends on the manufacturer and model.
- Unscrew the two or four screws holding the tail light cover
- Next step is to take the light bulb out
- Usually, there are some clips or bolts that are holding the housing onto the snowmobile. Unscrew these bolts as well. They should be easily accessible.
- Pull out the housing without breaking it (usually it’s made of plastic and if not handled carefully, it can crack)
- Now, it’s time to cut the wires. If you want to be able to put the old ones back, try to cut directly from the connector entrance, or better, pull it out of connector (if possible). If you don’t care about the old tail light, just cut it from anywhere you want.
- Time to install the new tail light. First, we need to make sure it actually works. So, at this point, connect the wires to see if the tail light comes on. If you don’t do this, you will regret it when you put everything back on and the lights aren’t even working. Connect the wires without touching each other to avoid a short-circuit. Be careful at this step!
- We need to make room for the new awesome tail light. Place the new tail light where you want to be on the sled. Mark the area with a cutter or permanent marker.
- Cut the plastic in order to make enough room for the tail light. Try to cut it in the shape of the tail light. You need to leave room in order to put the screws in to hold the new tail light. It’s no problem if you cut the hole bigger, but make sure there is plastic behind the new light in order to be able to attach the new screws.
- Put the tail light in to see that everything is ok
- Connect the power wires: Twist the wires, solder them or get a connector. I usually go this route: twist the wires, solder them and put a plastic tube around them using a heat gun
- Get some long enough screws to fit the new position. They need to go through the other side of the plastic. But, they don’t need to be too long, because they will stand out and you can cut yourself when reaching that place (or someone else). Try to find the perfect screw length.
- DONE! If you followed these steps closely and adapted them when needed you successfully installed the LED lights. Cool, huh? Go show your friends now, and teach them how to do it on their sled.
What if the sled doesn’t have the brake switch
If your snowmobile wasn’t designed with a brake switch, the tail lights won’t be able to “guess” when you pressed the brake. There is a switch placed in the brake lever that closes the circuit when you press the brake.
The best and easy way to go, is to install a new lever. Replace the old one with a lever that has the switch. You can find them on eBay at resonable prices.
What if you don’t have tail lights at all?
Some old sleds don’t even have tail lights. In this case you will need some additional wires for this process. The connection wires can be found near the power source, usually above or near the gas tank. Get some wires and connect them to the power and ground.
Next step is to get the wires to the back of the snowmobile. Usually, the best way to do this is to place them under the seat. Once you get the wires to the back of the snowmobile, the process is the same as above.
Use plastic tubes after soldering the wires, they need to remain waterproof/snowproof after all. You will need a heat gun for this. You can use a lighter but I don’t recommend this way as you could melt/burn the wires.
Do you have AC?
If your sled doesn’t have a battery, you have a great chance of having AC (alternative) current at the tail lights. Read the “Change your bulb with a LED” heading below to see what you should do in this case. You will probably need a rectifier. The LED is basically a diode and let’s the power to flow only one way.
Replacing the Bulb
1. There are a couple screws that need unscrewing. On some models, there are 4 of these
2. Get the cover off, just pull it out gently. Be careful as this is made of plastic.
3. Getting the light bulb out it’s pretty easy, sometimes it will just need rotating a bit or pull it out
4. Replace it with the new one. Again, rotate or push the new bulb into place
5. (Optional) you can check that you put it in right place and the connection is working. Start the snowmobile and check if the light comes off
6. If it’s ok, put back the cover
7. Put back the screws, but don’t tight too much. The cover is made of plastic and could crack
Snowmobile Tail Lights – Incandescent bulb vs LED bulb
Usually, older models use incandescent bulbs. These produce more heat and can melt the snow on the tail light, but are not as powerful as LED bulbs. LED bulbs use less energy to produce the same amount of light. So, using LEDs there can be an improvement of 800% really, depending on the LED type and specs.
Snowmobile Laser Tail Lights
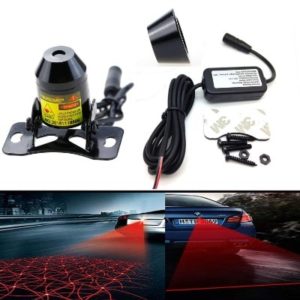
Laser lights
I saw this laser tail lights on bicycles and cars, but not as often on snowmobiles. I think they are great, but installing them can be more technical. Usually, they come with a step-by-step tutorial, but you need to know basic electronics. They are great for some weather conditions like fog where incandescent bulbs and LEDs don’t do a great job. The process is almost the same as the LED mod described above.
These been said, it’s another method to make yourself visible on the track, and they look fancy too.
How to fix the Tail Light?
Usually, there are three wires that need to be connected. First, make sure you get electricity to the power wire.
So, to troubleshoot your tail lights, check these things:
- Make sure you have power at the power wire
- Make sure all three wires colors match the tail light at the connection
- Make sure your light bulb is OK. I’ve had some light bulbs that looked fine, but won’t light. This is valid for incandescent bulbs only. LEDs burn out less often, but in order to be sure, test them with a battery.
If your brake light won’t light it could be the brake light switch at the brake lever.
Is it the switch?
Usually, there is an orange wire at the caliper switch. If this switch is hot (this means current is flowing through it) connect the two terminals to see if the brake light comes on. If you get the light, the problem is clear: the switch is broken. If the light doesn’t come on there is a wiring problem and you need to check the circuit. The wires go under the seat and come out near the tail light. Before jumping to the wires, make sure the connection with the tail lights is working.
If the switch is not hot, the problem can be some damage to the switch itself. You can try to cut the orange wire from the switch connector (about two inches before the switch) and tap into the hot off of voltage regulator supply. The voltage regulator supply is near the caliper switch. Now, the light should come on and you are ready to go.
It can even be the connector. If it’s rusty or dusty try to clean it with an electric contact cleaner spray. Or, even better, replace it. Again, we need to make sure that we have power at this point (before the connector).
Snowmobile Trailer Tail Lights
To make your trailer visible on the road, you need to install trailer tail lights. Again, there are multiple shapes here. If your trailer doesn’t have tail lights, installing them is a must! Choose the ones that fit your trailer shape the best. The installation is pretty simple and most trail tail lights come with a manual that contains step by step instructions. Like the other types of tail lights, they have a stop, turn and tail light functionalities.
The industry standard is a 3-prong plug with attached 12″ wiring, so installation is pretty simple. The most important specifications about trailer lights are:
- LED
- Waterproof
So, if you choose a tail light with LED technology and waterproof with the right dimensions for your trailer, you should be good. There are models which do not require holes or screws.
Snowmobile Helmet Tail Lights
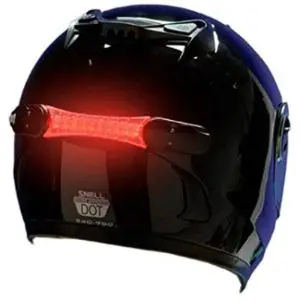
Helmet tail lights
There are some brake lights for helmets, but I couldn’t find any helmets with tail light by default. Anyway, you can buy a universal tail light and install it on your helmet easily. This will make you even more visible on the track. There are plenty of options available, including wireless helmet brakes.
Snowmobile led tail light bar – Side
There are plenty of bar strips that you can install on the side of the snowmobile. This way, besides looking awesome, you can be easily spotted from the side. Installation is again easy and will probably require connection to the back tail light wires.
Snowmobile LED light bulb
LED bulbs are as much as 8 times brighter than the classic incandescent bulbs. That’s why they are used now on most new snowmobiles and many sleds owners install them as a mod. They also consume much less current than the incandescent ones.
Change your bulb with an LED – problems
LED bulbs will work only on DC and not AC. The LED is a diode, so it lets the current flow only one way. AC is having two cycles and won’t work. If the AC frequency is low the light bulb will light intermittently.
If your snowmobile doesn’t have a battery, it’s likely that you have AC current. Installing a LED will be no good as when you rev up the engine the light will dim and flicker. That’s because the LED will get current flow only on the upper cycle.
What you need to do is to install a rectifier which you can buy online. This will transform your AC current to DC. So, you need to rectify the current from AC to DC for an LED to work correctly. If you feel nerdy and want to make the rectifier yourself read this post on All Circuits Forum. You will understand better why LED doesn’t work well on AC.
Conclusion
Now, you know almost all that needs to be known about snowmobile tail lights. You know how to change the bulb, how to mod your snowmobile to have a nice LED light and how to troubleshoot the tail light. If you found this article useful, or if you want to add something, feel free to add a comment below. If you have photos with your LED installed post them as well.